Datalogic Matrix 400 Instruction Manual
Browse online or download Instruction Manual for Networking Datalogic Matrix 400. Datalogic Matrix 400 Instruction manual User Manual
- Page / 24
- Table of contents
- BOOKMARKS
- Matrix 400™ 1
- QUICK REFERENCE GUIDE 1
- SERVICES AND SUPPORT 2
- STEP 1 – ASSEMBLE THE READER 3
- STEP 2 – CONNECT THE SYSTEM 4
- STEP 4 – FOCUS THE READER 7
- MATRIX 400™ QUICK GUIDE 10
- MATRIX 400™ QUICK GUIDE 11
- STEP 9 – TEST MODE 16
- HOST MODE PROGRAMMING 17
- ALTERNATIVE LAYOUTS 17
- CODE QUALITY VERIFICATION 17
- APPENDIX 18
- = 2 (d + 35 mm) tan (α 19
- TECHNICAL FEATURES 20
- MECHANICAL DIMENSIONS 21
- PATENTS 22
- COMPLIANCE 22
- SERIAL NUMBER REFERENCES 23
- DECLARATION OF CONFORMITY 24
Summary of Contents
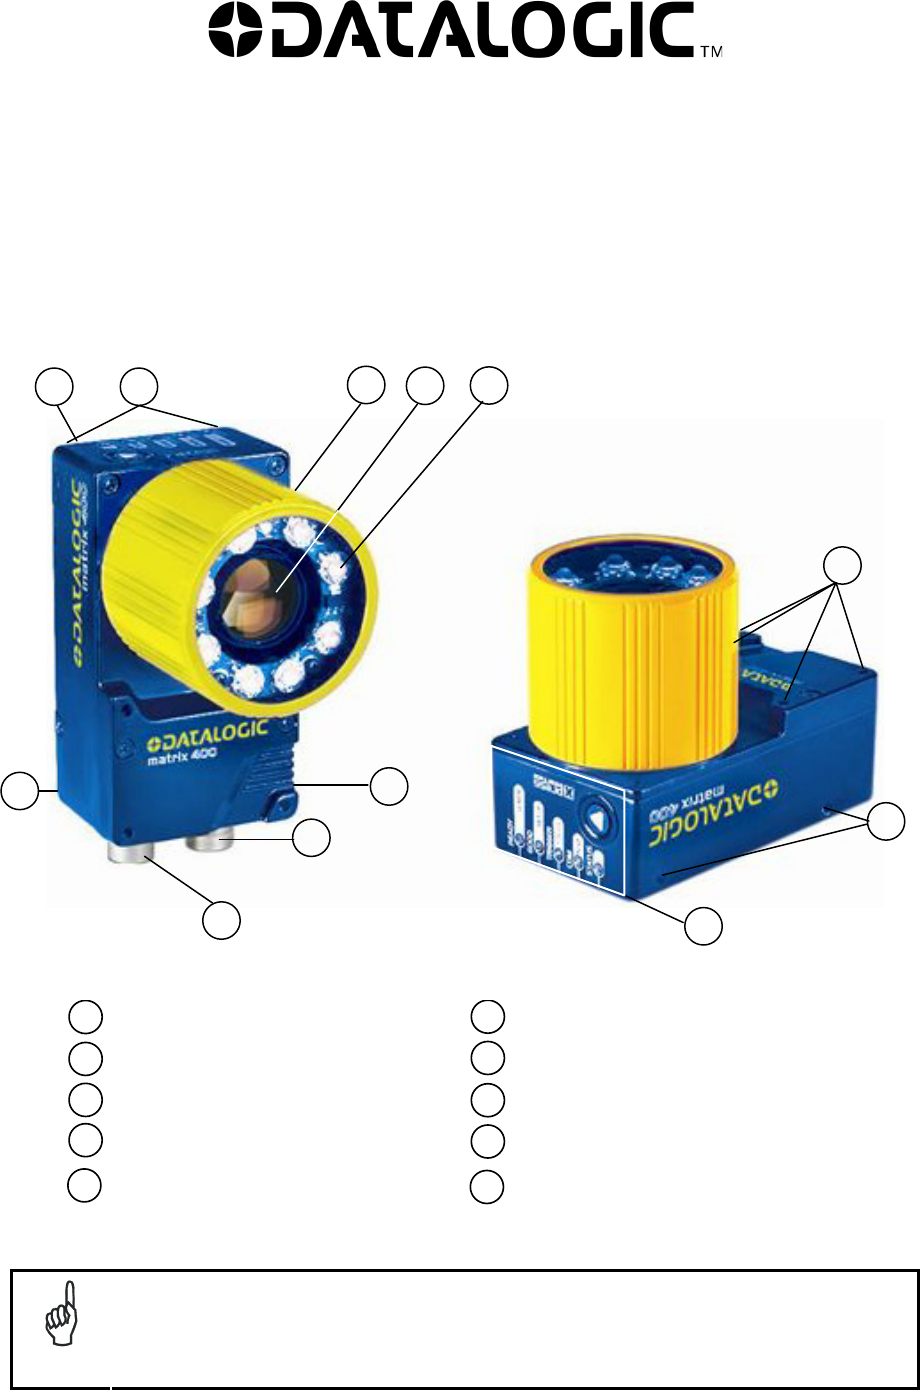
Matrix 400™ QUICK REFERENCE GUIDE Figure A 1 2 3 4 987Device Class Label Mounting Holes (12) Lens Cover Lens (separate accessory) &qu
MATRIX 400™ QUICK GUIDE 10 STEP 7 – INSTALLING VISISET™ CONFIGURATION PROGRAM VisiSet™ is a Datalogic reader configuration tool providing several
MATRIX 400™ QUICK GUIDE 11 STEP 8 – CONFIGURATION USING SETUP WIZARD The Setup Wizard option is advised for rapid configuration or for new users.
MATRIX 400™ QUICK GUIDE 12 3. Press the "Positioning" button. The reader continuously acquires images and gives visual feedback in the vi
MATRIX 400™ QUICK GUIDE 13 5. Press the "Fine Focusing" button to activate the Fine Focusing Tool. The reader continuously acquires image
MATRIX 400™ QUICK GUIDE 14 Rotate the Focusing ring in the opposite direction. The Current Focus Quality Bar (green) increases towards the vertical
MATRIX 400™ QUICK GUIDE 15 7. Place the application specific code in front of the reader at the same reading distance and repeat steps 3, 4, and 6.
MATRIX 400™ QUICK GUIDE 16 STEP 9 – TEST MODE Use a code suitable to your application to test the reading performance of the system. 1. Enter the
MATRIX 400™ QUICK GUIDE 17 ADVANCED READER CONFIGURATION For further details on advanced product configuration, refer to the complete Reference Ma
MATRIX 400™ QUICK GUIDE 18 APPENDIX X-PRESS™ is the intuitive Human Machine Interface designed to improve ease of installation and maintenance. St
MATRIX 400™ QUICK GUIDE 19 OPTICAL ACCESSORY SELECTION Referring to Figure 20 and the formula below, use the data in the following table to calcula
MATRIX 400™ QUICK GUIDE 2 UPDATES AND LANGUAGE AVAILABILITY UK/US The latest drivers and documentation updates for this product are available o
MATRIX 400™ QUICK GUIDE 20 TECHNICAL FEATURES ELECTRICAL FEATURES Power Supply Voltage 10 to 30 Vdc Consumption 0.8 to 0.27 A, 8 W max.; 0.5 to
MATRIX 400™ QUICK GUIDE 21 CODE QUALITY VERIFICATION Standard Supported Symbologies ISO/IEC 16022 Data Matrix ECC 200 ISO/IEC 18004 QR Code ISO/IE
MATRIX 400™ QUICK GUIDE 22 PATENTS This product is covered by one or more of the following patents: U.S. patents: 6,512,218 B1; 6,616,039 B1; 6,8
MATRIX 400™ QUICK GUIDE 23 SERIAL NUMBER REFERENCES Place the replicate, lens, illuminator and filter serial number labels here for reference. Som
DECLARATION OF CONFORMITY 08Datalogic Automation S.r.l. Via S. Vitalino 13 40012 - Lippo di Calderara Bologna - Italy dichiara che declares that
MATRIX 400™ QUICK GUIDE 3 STEP 1 – ASSEMBLE THE READER The first step to perform is to assemble the accessories that make up the Matrix 400™ reade
MATRIX 400™ QUICK GUIDE 4 STEP 2 – CONNECT THE SYSTEM To connect the system in a Stand Alone configuration, you need the hardware indicated in Figu
MATRIX 400™ QUICK GUIDE 5 19-pin Connector Pinout for Matrix 400™ The table below gives the pinout of the 19-pin M16 male connector for connection
MATRIX 400™ QUICK GUIDE 6 STEP 3 – MOUNT AND POSITION THE READER 1. To mount the Matrix 400™, use the mounting brackets to obtain the most suitab
MATRIX 400™ QUICK GUIDE 7 STEP 4 – FOCUS THE READER Matrix 400™ provides a built-in tool called Blue Diamonds™ to aid focusing the reader. The Blu
MATRIX 400™ QUICK GUIDE 8 STEP 5 – CALIBRATE IMAGE DENSITY In order to function correctly to the fullest extent of its capabilities, Matrix 400™ m
MATRIX 400™ QUICK GUIDE 9 STEP 6 – X-PRESS™ CONFIGURATION Once Matrix 400™ has calibrated image density, you can configure it for optimal code rea
More documents for Networking Datalogic Matrix 400


Related products and manuals for Networking Datalogic Matrix 400
 (128 pages)
 (20 pages)
 (4 pages) (142 pages)
© 2020, manymanuals.com. All rights reserved. | 2.345 s |
 Manymanuals.com
 Manymanuals.de
 Manymanuals.fr
 Manymanuals.it
 Manymanuals.pl
 Manymanuals.cz
 Manymanuals.es
 Manymanuals-pt.com
Comments to this Manuals